Time for a pizza.We set the oven to 350º and waited for the convection fan to start. But the characteristic flame whoosh start never happened! It felt like a fairly complete block out. Nothing even hinted of coming on down below, in the oven. Was it an electronic relay? , some control panel failure? the range burners worked fine. ??
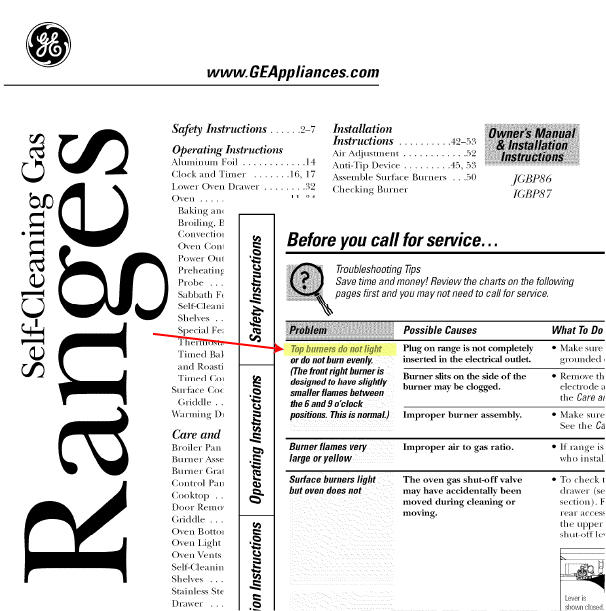
The owner’s manual provides a lot of guidance on use but it does not mention “oven won’t start” in the troubleshooting section.
In an earlier day, I would be stuck and need to call and wait for an expensive repair visit. Today, through the power of IP networks and Google crawling / searching, home appliance repair has democratized and opened for people like me.
Why Won’t it Start?
A simple search for “oven won’t start” turns up thousands of useful entries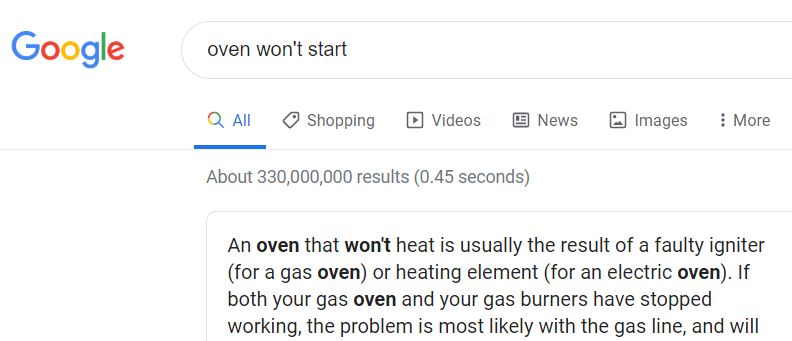
And the first of these offers a very clear video by RepairClinic.com that gets right to the top four reasons, using a stove that even looks like ours.
Based on the video it seems the oven’s glow bar may have need replacing.
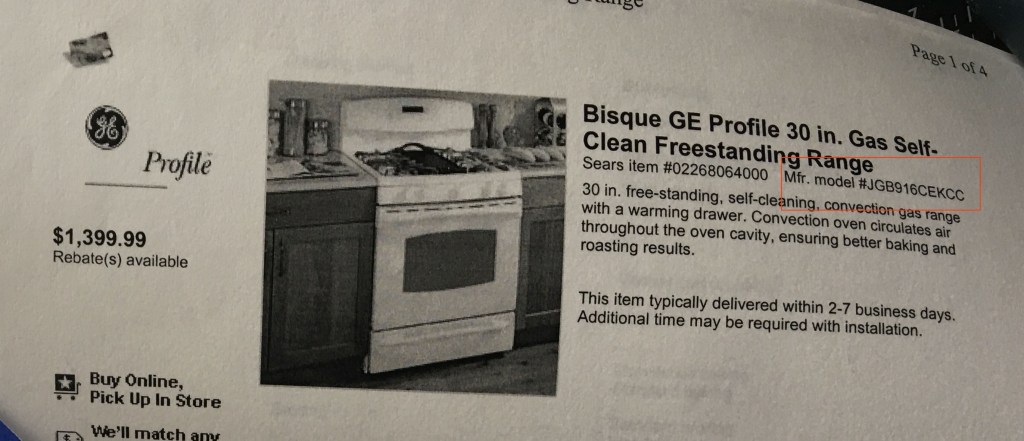
What’s Our Stove’s Model Number?
Then to look up the part we needed to know the model number of our stove. That could be in any of these nine places 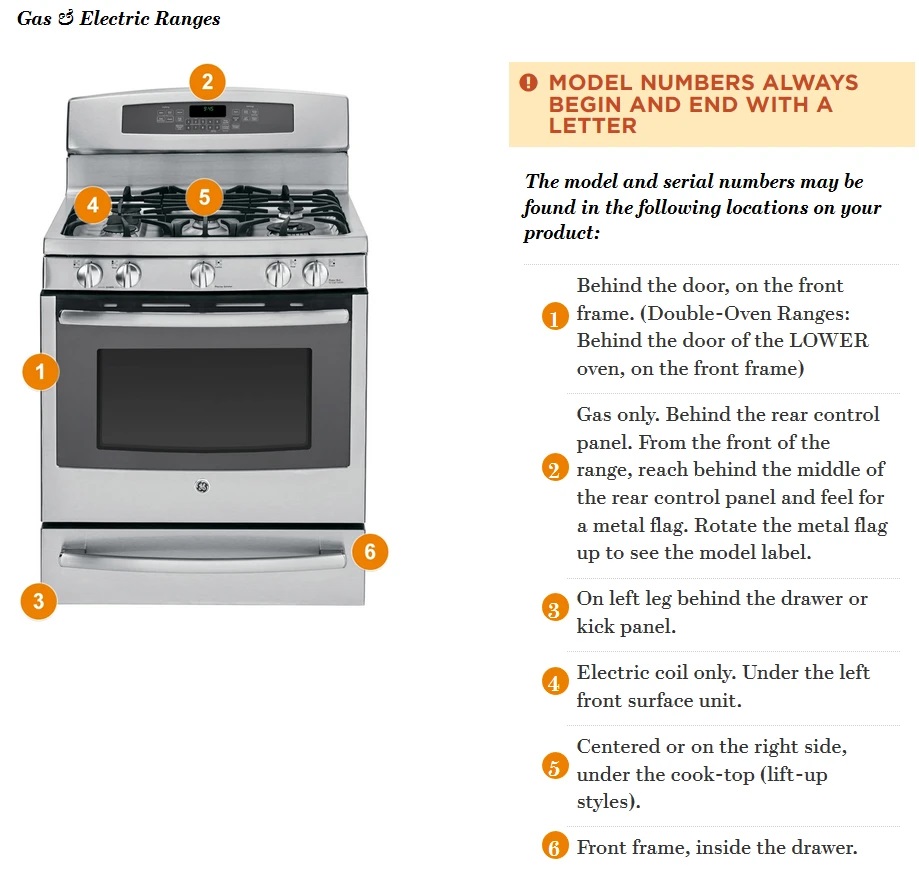
We pulled it out and searched the usual places…


But we never found it there on the stove. Instead Tricia dug up our old order and Internet research at the time of buying the stove (15 years ago) and found it there:
We also came across this envelope stored in the drawer that was marked “Do Not Remove Envelope or Destroy Contents”. Also “For Technicians Only”! Not to fear, our daughter Carolyn had showed us how to “become technicians”.

This rich-with-details document contained not only the actual part number for the igniter, but also many other points and diagrams.
How Can I Get the Part?
That was the key. With the model number, JGB916CEKCC, and the part number, WB13K0021, we could look up the right igniter part and order it. We started with PartSelect.com, one of a few online parts stores that popped up on Google when we searched for the model number.
Even though PartsSelect could not find our exact model number they presented quite a few “close” model numbers to choose from:
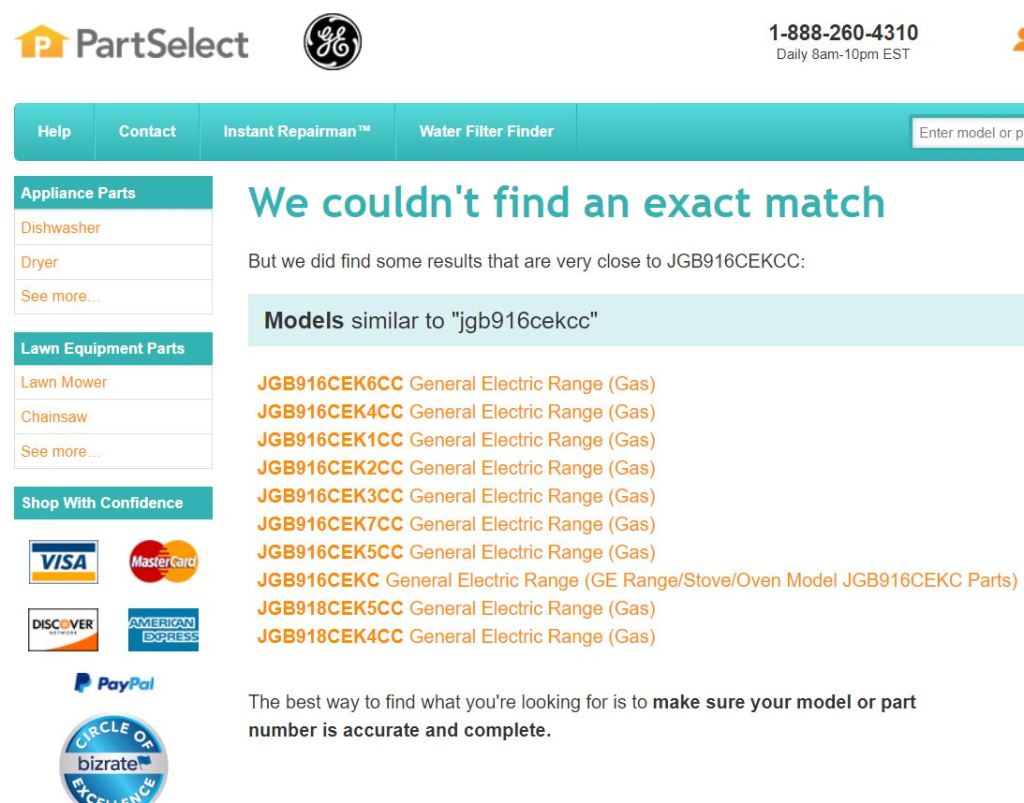
In fact these models are all just variations of features. The “guts” of the stove, including the igniter remain the same across them all, so selecting any one of these would work.
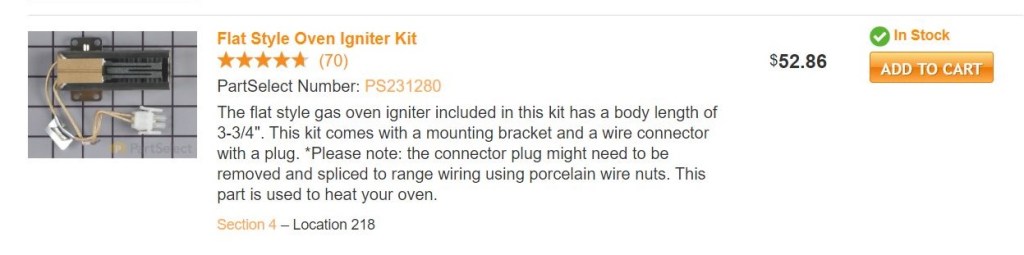
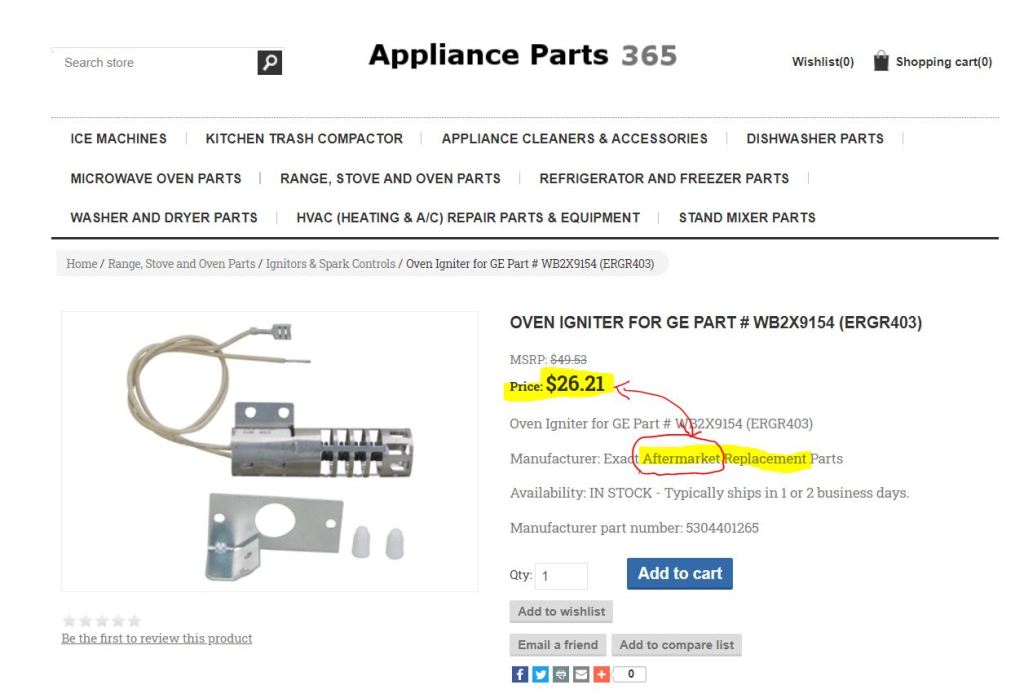
And here came PartSelect’s Igniter and price:
Pretty good but we did the “due diligence” shop around.
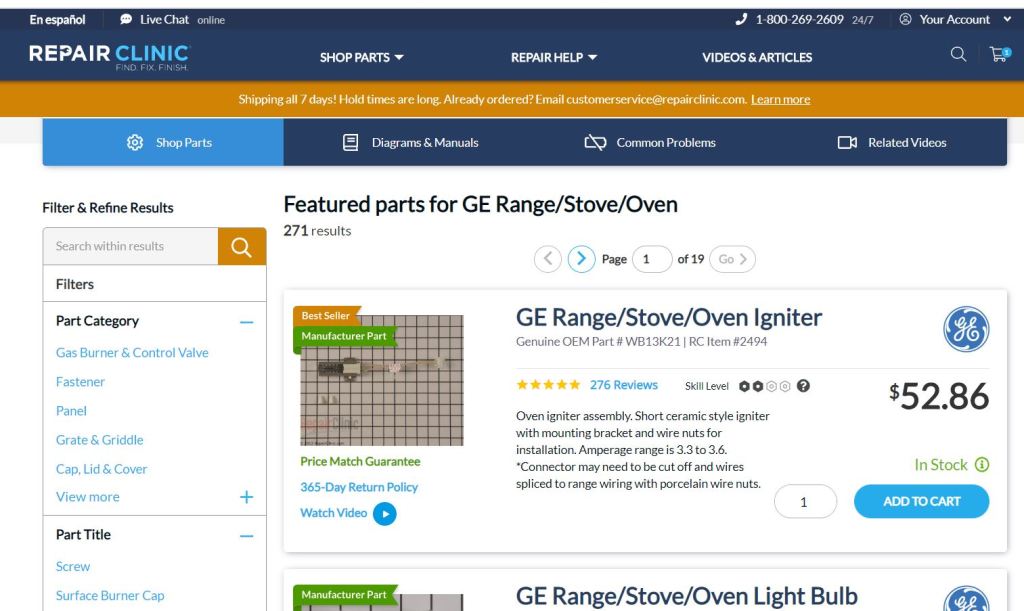
Repair Clinic offered it for about the same price! and they had provided the helpful video:
Then there was this half price offer the looked good until I read the source was an after market company. I find after market knockoffs risky in that the part might not fit or work as well as the manufacturer’s part.
So we needed to decide between Repair Clinic and Parts Direct. I searched for “reviews” against both companies and came up with this result:
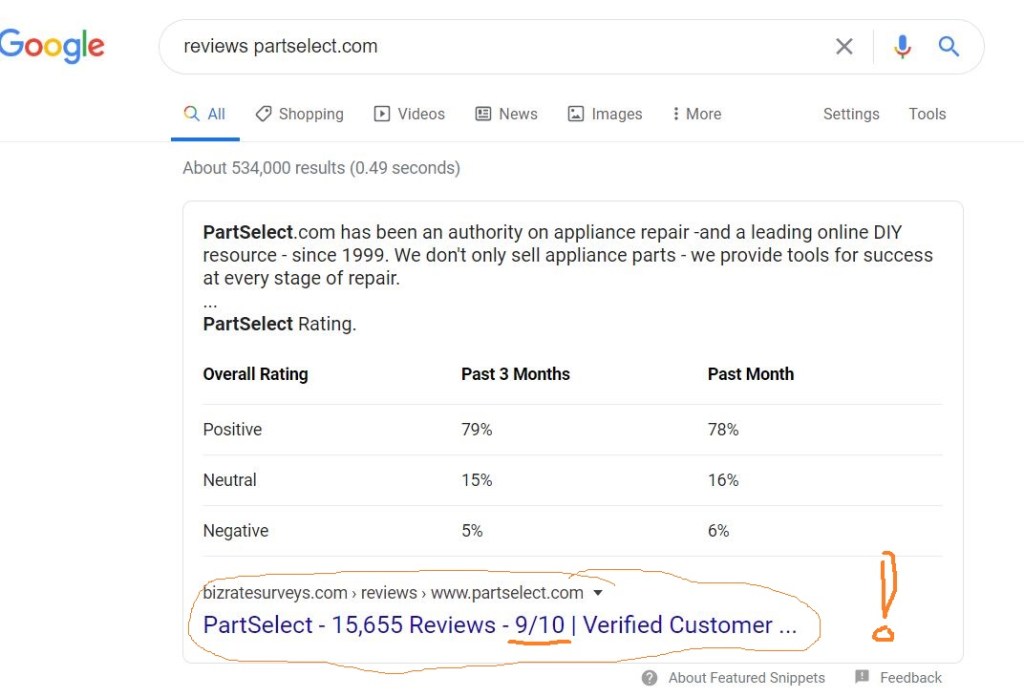
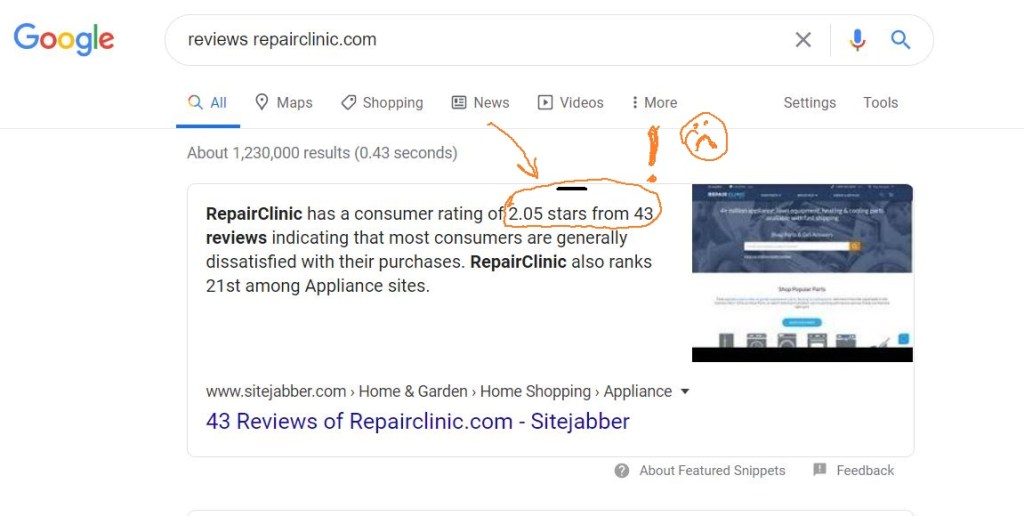
Parts Direct won by a land slide. We ordered the part.
How Do I Get the Part Out?
Now to take apart the oven and get the part out. The “how to” video accompanying the part helped us see the process of removing panels to get to the igniter and we proceeded that far with it:


But from there the video guidance petered out. Luckily the “Technicians Only” instructions provided the path to actually removing the glow bar. It involved more than the video had hinted at. Before allowing one to get at the igniter it required removing the “Bake Burner” – the gas tube running down the middle of the oven:

And removing the Bake Burner started with removing the warming drawer underneath, more of an obstacle than you would imagine. We tried various means to get it out. Then we went back to Google Search for “removing oven drawer lower” and variations thereon. That resurrected various means that did not work for ours. Finally we came across this response to a post on FixYa site.
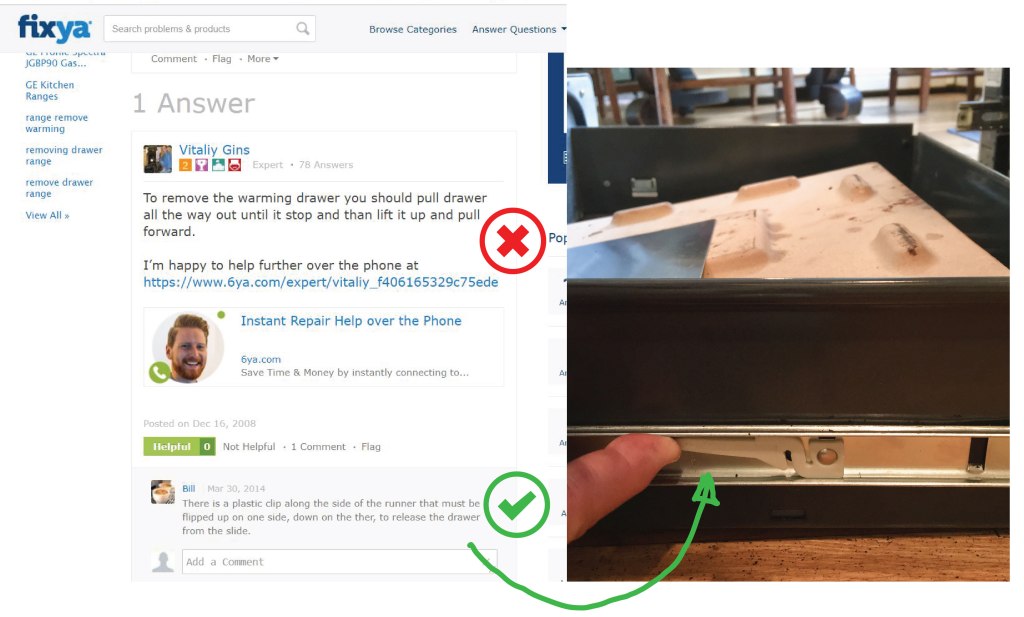
That little comment, put in by some kind soul, and directly controverting what the main guidance directed, proved the solution. One side up the other down. And one needs to play up and down to know which side’s clip goes up.
So finally with the drawer now out… we could remove the bake burner and then remove the igniter.


And finally unscrewed the igniter from the gas tube / “Bake Burner”
Can I Get the Part NOW? Locally?
And at this point Tricia showed up. When she heard that the part was many days away from delivery she pointed out we had guests that weekend and you could just drive up to Atlantic Appliance, my usual parts source and get the part there. Good point. I called. They said they had it. I cancelled the PartSelect and went up.
Got to say that Atlantic Appliance looked a wreck, staffed by only one person now, the owner and set up in a different smaller location than his usual. When he finally got off the phone and to me, Bill first said let me put a tester to your current igniter and see if it needs replacing. “I couldn’t sell ya one if you didn’t need it.”
Is The Part Broken? Continuity
So he took his multitester and my part to evaluate “continuity” – which means a continuous electric path from one end of the igniter to another. If that path breaks, continuity from one end to another is lost and the unit needs replacement. From yet another RepairClinic.com video, here’s a depiction.
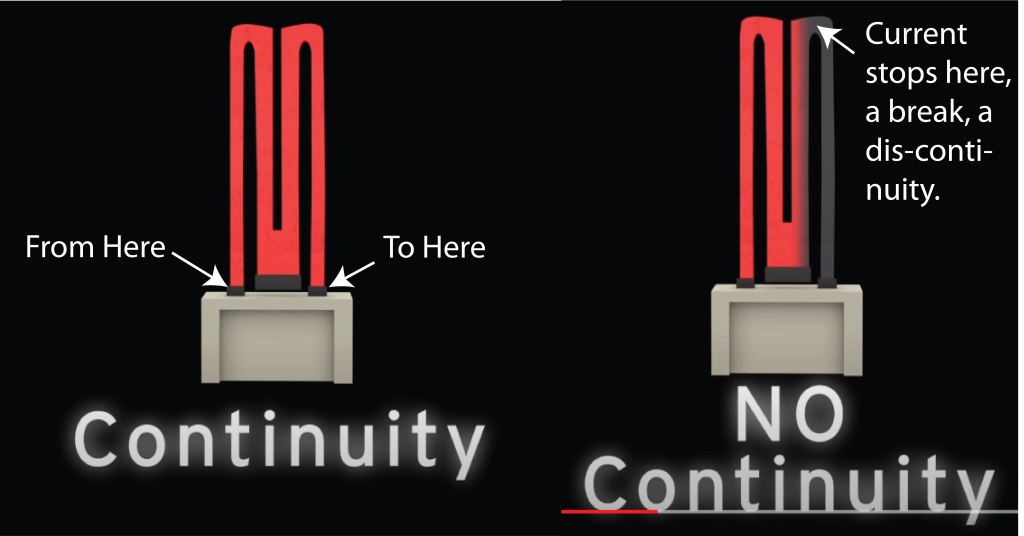
The multitester, with one of its probes on one end of the circuit and the other probe at the other end can detect a break, a discontinuity. It does this by measuring the resistance the circuit (wire, diode, etc.) applies to the electric current going across it. It measures this with a metric called Ohms of resistance. Here’s a view of the relative electric resistance of different metals at different temperatures that I found useful to understand resistance:

The multitester did show that the igniter was broken. Like this:
So Bill of Atlantic Parts said yes indeed it needed replacing and he had the part. When he brought out the boxed part I realized it did not have the plastic wiring harness at the end of the wires and pointed it out. “Oh, you just splice em! I’d have to charge you 40 more dollars for the one with the harness. You know how to do that don’t you? They included the terminal caps here. You just cut it here and affix the previous harness wires here…. etc.” I felt very hesitant but he had helped me , he knew my dad, he had thanked me for coming. I bought it. With misgivings.
When I got home and explained the splicing to Tricia, she said “Are you crazy?!

You won’t even let me splice an extension cord and you want spliced wires inside an oven?” She was right.
I reordered the part from PartSelect. They offered it at $6.00 less than Bill’s harness-missing part.
The next day I brought the part back to Bill. He was furious. The formerly friendly hale fellow old friend said with a scowl “WHAT is WRONG? Don’t ruin my day! That (the PartSelect order) is not a genuine GE part. The wiring harness probably won’t fit. etc.” – a stream of angry abuse but he refunded it. On the way out he yelled, over the heads of the other customers waiting behind me, “You can’t cure STUPID!” Bill is a dinosaur in an online world who should have closed many years ago. Too bad but I will never darken his door again.
How Do You Install It?
And a day later, the part arrives, one day early and on July 4th! complete and wired:

We put the igniter on the bake burner.


And proceed to reinstall the burner tube, and plug in the new igniter into the oven.
Now to test it.
Put the cover back on, the racks in and


…It works! Success.

Thanks to all who contribute.

[…] and since I could not find the right exact match. I called Parts Select who had helped me on the last major appliance repair project. Jessica from Parts Select explained that as models get older demand for parts fades and they do […]
LikeLike