Tricia had fallen down the second floor stairs, hit the wall at the landing and tragically broken her neck. Luckily no spinal column compromise, no paralysis but a long and slow recovery is underway.
She has moved from the walker, out of the neck brace and now, we hope, to more normal living, but she needs hand rails and grips everywhere.
Like the bathroom.
She is now feeling the need to get back to the laundry and more. Unfortunately the laundry here – the washer and dryer – sits down in the cellar. And the cellar stairs, though familiar and strong, might seem treacherous to an OSHA inspector or a residential building code reviewer here in the town of Hingham.
They built the stairs in 1927 — before building codes ruled – without any handrails and rather “hands free”. These are Not cool as you age and lose mobility.

So we needed to add a railing or railings.
As we thought about it …
- Which side do they go on?
- How to affix?
- Could we screw into the concrete wall?
- If we put a railing on the “open” side, wouldn’t that block our way of moving the big items – air conditioners, furniture, etc. — up and down from the cellar? {We can’t store items in the attic and needed the cellar for storage. So, we took advantage of the lack of rail to use the stairs almost like a ramp for big items.}
Once again search engines offered plenty of solutions.
Lowes offered a neat handrail…

…but it only went 6.5 feet.
And… should we use two rails? A rail on the concrete for the lower half of the stairs and then another rail on the other “wall” side for the upper portion?

It felt dangerous.
So Tricia asked, “what does the building code require?”
Good point.
It turns out the we found the codes and they clarify the choices.
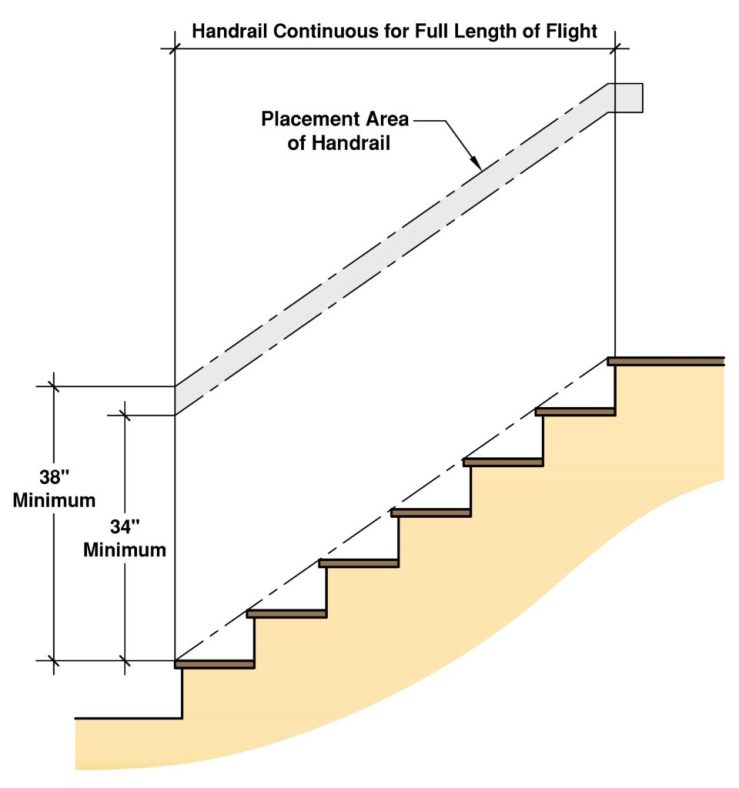
- …. Stairways more than 4 steps must include a handrail.
- The handrail must be continuous for the full length of stairs, so the rail cannot split side to side.
So it needed to go the full length of at least one side.
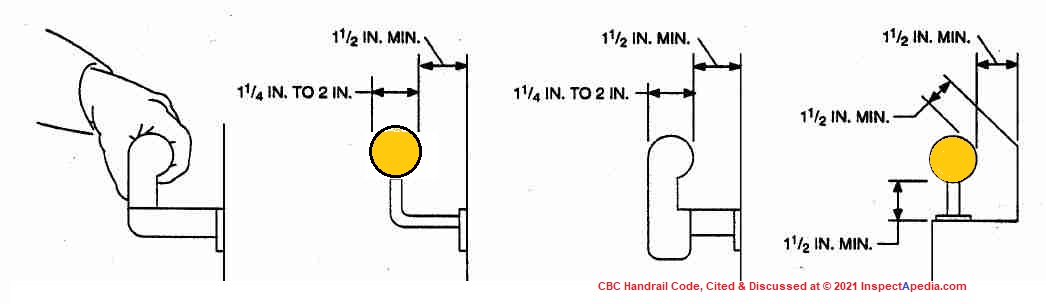
Code also insisted that the hand rail must leave at least 1 ½ inch for “knuckle room”. The area between the rail and the wall, that is.
The side of the stairs away from the concrete foundation appeared to offer more room. So, we figured the one handrail should fit on the “open” side away from the concrete foundation.
We continued searching but now for a single handrail.
Options abounded. The Railock system used huge “safety” handrails that dropped into place and could be removed for access.
But these were WAY too big.
A “Promenade” handrail system offered the ease of an embedded slider track with a modern tasteful look.
But it needed wall mounts all the way up or down and would not cover our “open” side of stairs.
So I searched for more information on selecting and installing wooden hand rails such as this video from This Old House:
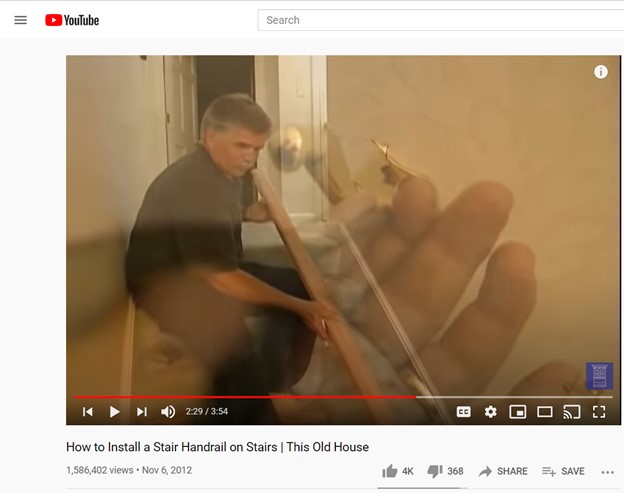
The carpentry for this option started looking very complex.
Then ….using the image search capability of Google search I searched for installing handrails and scrolled down through the images and found this picture: –
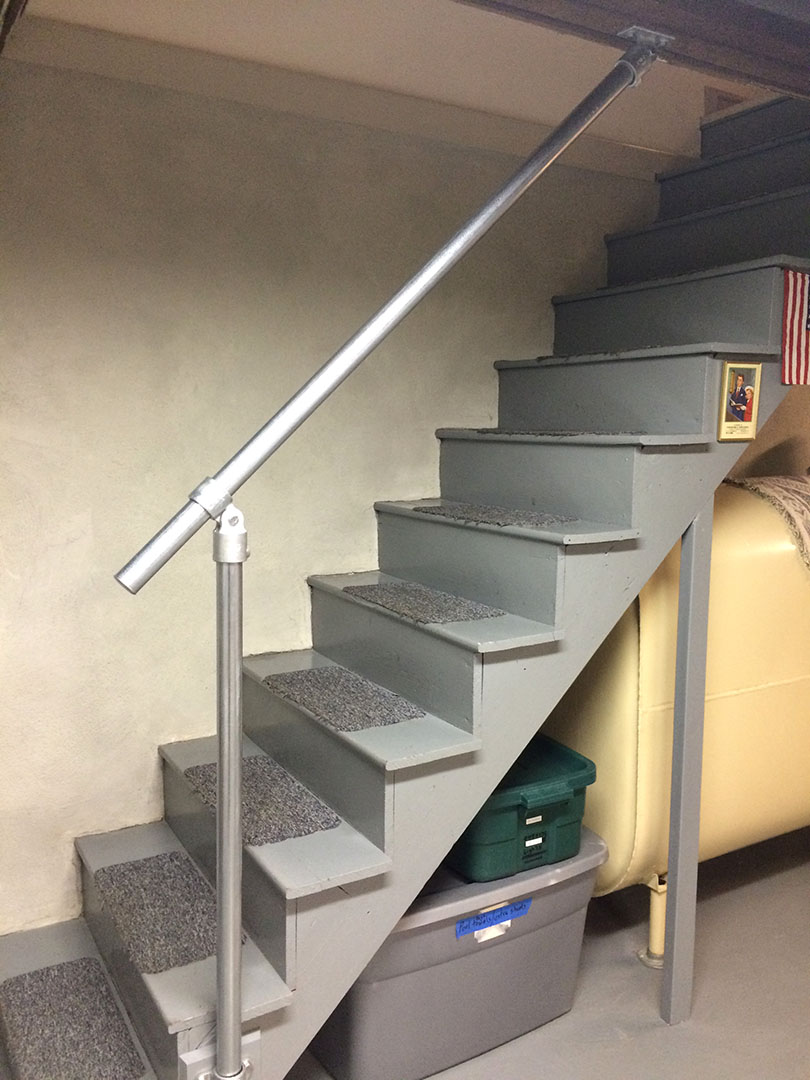
It caused a double take — the spitting image of our cellar stairs but with a neat clean secure hand rail added on the open side.
I searched for the source of this type of handrail fitting and found Simplified Building and their range of Key Klamp and Key Lite fittings (invented in the 1930’s and distributed by KIG – England). They brought a simple but strong method to our whole challenge. We needed a hand rail that could go top to bottom, on the open side of our stairs, and would remove easily when we needed wider access.

This did it.
Their instruction materials and content (Simplified Buildings) brought my attention to the Americans with Disabilities Act (ADA) specifications that were relevant to us….namely “Smooth and Continuous — The surface of ADA compliant handrails should be smooth and continuous. Someone using the railing should be able to maintain a consistent grip and easily run their hand along the entire handrail.” Source Simplified Building
We wanted that aspect as well.
So now… on to select the Kee Lite fittings, pipe lengths and order them.
And after much thought and hand drawing and discussion we decided on the following:
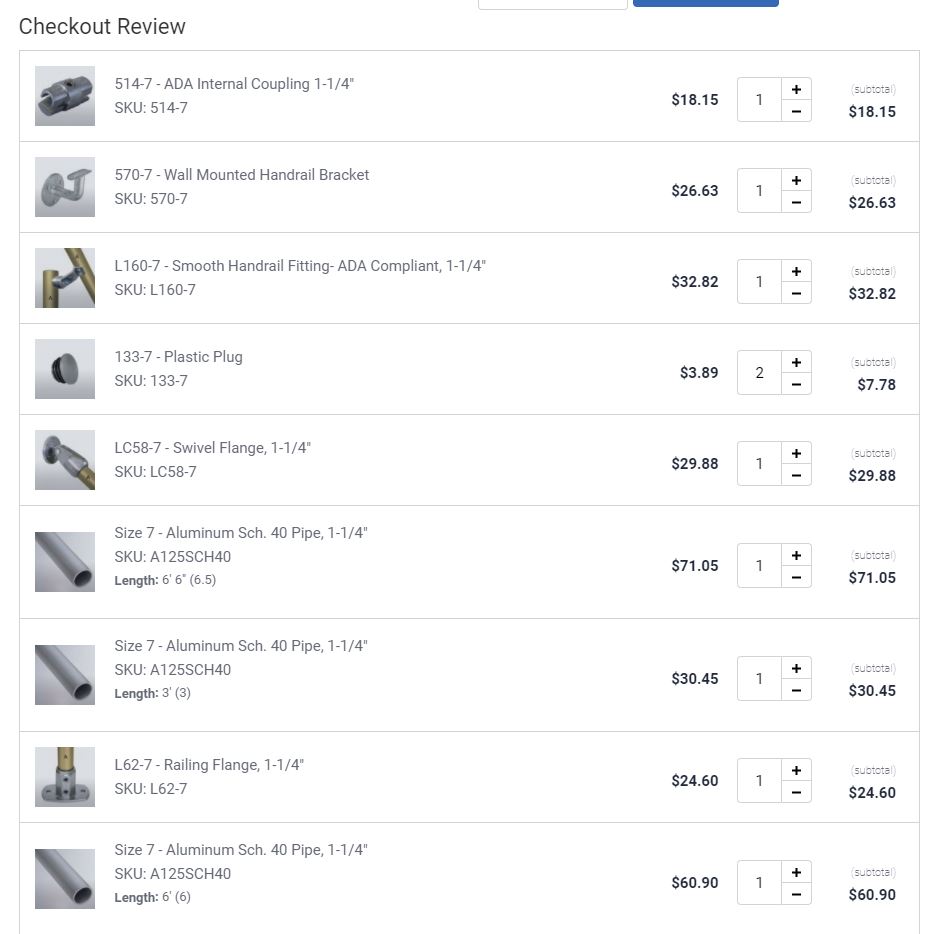
And in no time they arrived:


Packed securely and ready to install.

But when it comes to installing them… “the devil is in the details.”
First I needed to “chalk line” the handrail position to run at the same height from top to bottom.
This was fine for the upper stairs part where the handrail ran against a wall. I used blue tape against the wall to show the line.

But it became a challenge when I needed to show the line and endpoint in the “open space” of the lower handrail.

First to anchor the top. I made the vertical trim mounting board a flat surface by tacking on a ¼ inch “filler” piece into the trim board’s “divot”.

Then I used a vice to hold the top anchor, called a “swivel flange” in Kee Klamp language, in place.

Which allowed me to drill a hole for and ratchet in three 2 inch lag screws.

Then with the handrail now anchored at the top, I moved to the mid point wall support:
This wall support needed to be positioned just the right distance from the wall to keep the handrail straight.

Which meant I needed to cut out the wall trim to attach it further back into the wall.
This led to a quandary. How to cut out this embedded-in wall trim? Circular saws could not fit, jig saws did not work. Maybe wood chisels?
I tried the wood chisel for a bit and it seemed hopeless.
I decided to search the Internet hoping some person would have run into the same challenge. I put it to Google this way:

And sure enough the very helpful SF Gate came to the rescue with exactly the guidance I needed – the right tool:

It was the first I had heard of this tool, an oscillating saw, and the more I learned through videos like this the better it fit what we needed.
So after much back and forth … e.g., Which brand has the most reliability? Should we get a portable and battery operated or corded? , etc….. we purchased this Makita Multitool (aka oscillating saw).

It worked perfectly for what we needed.
We needed to embed it about 1/16 of an inch more back to allow the handrail to run down the stairs straight.
So we used a chisel to go a bit deeper into the beam:

We needed to embed it about 1/16 of an inch more back to allow the handrail to run down the stairs straight.

And for the hand on the rail to pass by without scraping knuckles we needed to clear the trim board from being too close to the handrail.
And it worked beautifully for that too:
So with the handrail path cleared and the midway wall support set, we needed to set up the landing post.
We tried various means (tripod, strings, levels with T Squares taped on, etc.) to locate the spot in space where the straight handrail tube would land on the plumbed support post at the right height.

But in the end it involved simple measurements and pencil marks on the base of the step to place the foundation for the railing post, the so called Railing Flange.
We quickly found, however that the stair step was not level. And to get the post plumb we needed to shiv up, bit by bit, the flange.

Note that this post foundation piece contains two set screws. The very helpful Simplified Building technical support professional, Nate, had suggested this piece over other alternatives because of that feature and it worked especially well to securely plant the post.
Now to fit the hand rail support piece, called the “L160-7 – Smooth Handrail Fitting- ADA Compliant, 1-1/4″ …

…to the post.
We needed to drill a hole to insert the “box bolt” which would secure the support to the post at just the right point in space, another measurement challenge:

The support affixes to the post with a box bolt or a blind bolt designed to expand within the pipe:

The bolt tightening should have been easy but I could not get a wrench into the fitting opening here to hold the one bolt as I turned the smaller bolt with a socket…

Here my struggles with various sockets and wrenches and vices to finally get it to work… barely:
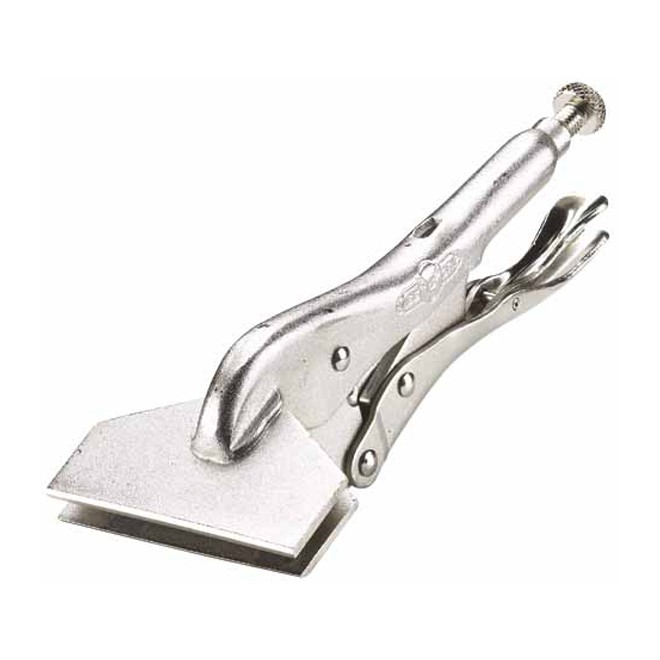
As shown, I finally squeezed into the outer opening a specialized sheet metal vice grip that could fit
So with the fitting on the post I could insert the second part of the pipe into the first part with the “ADA Internal Coupling” …


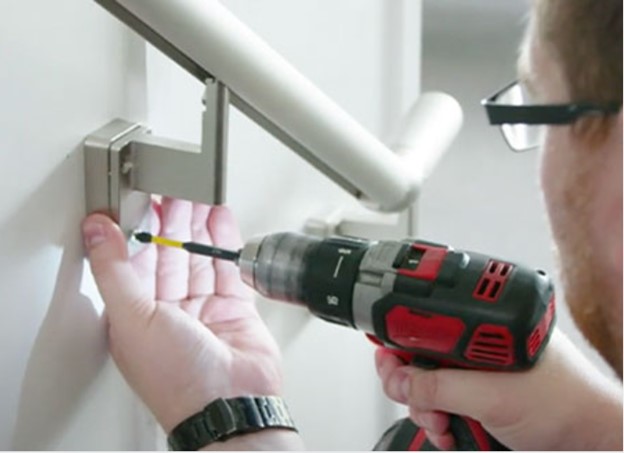
Finally with the hand rail straight and consistent I drilled holes for and screwed in the support screws.

Started the self tapping screws with a hammer – I used hex ended self tapping bolt screws to do this.


And used a ratchet to tighten them. And unfortunately over tightened one snapping the head…And leading to lots of challenge trying to back it out
But with the screws in we could trim the handrail to length with a pipe cutter,

insert the end caps, and finally allow safe transit!


In fact the stairs feel great now. The hand feels smoothness all the way down. Its solidity and strength makes one feel quite secure. It actually helps when bringing heavier objects up or down to grab the rail. Plus we can easily remove the lower section for moving big objects to and from the cellar.
We can’t believe it took us 42 years to add it and we are extremely pleased with the results.
Tricia searched the web and found that Niagara falls park has been using the same Kee Klamp system as our new stair rail for over 50 years. (They need to take it all down in winter and put it back up in spring; hence the value of the set screw and easy disassembly / assembly.)

She remembered our trip to Niagara with our four red headed children and sure enough we surfaced a picture of all four leaning on a Kee Klamp rail.

Kind of cool.
